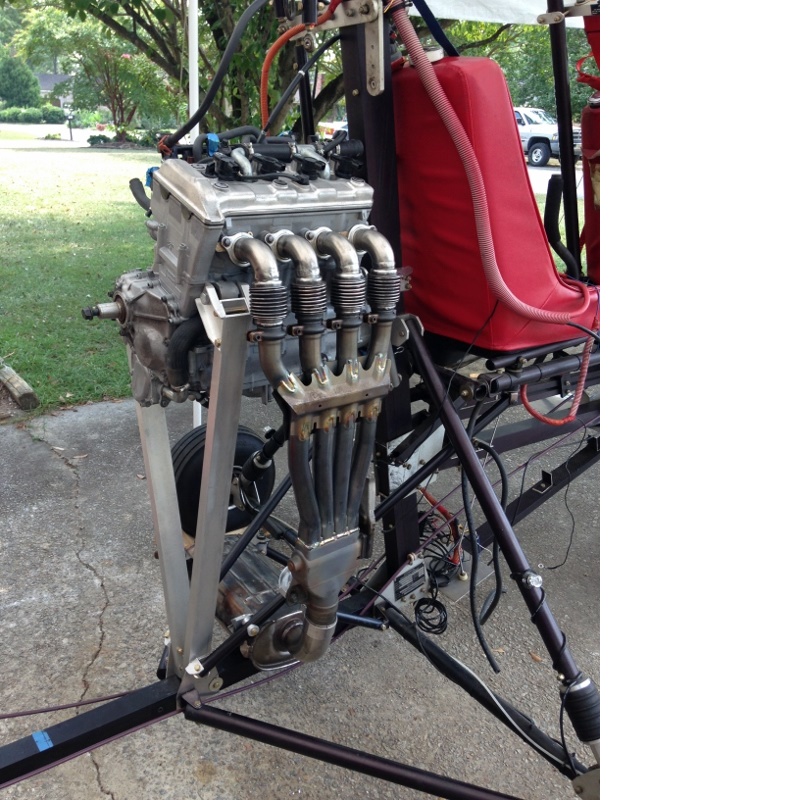
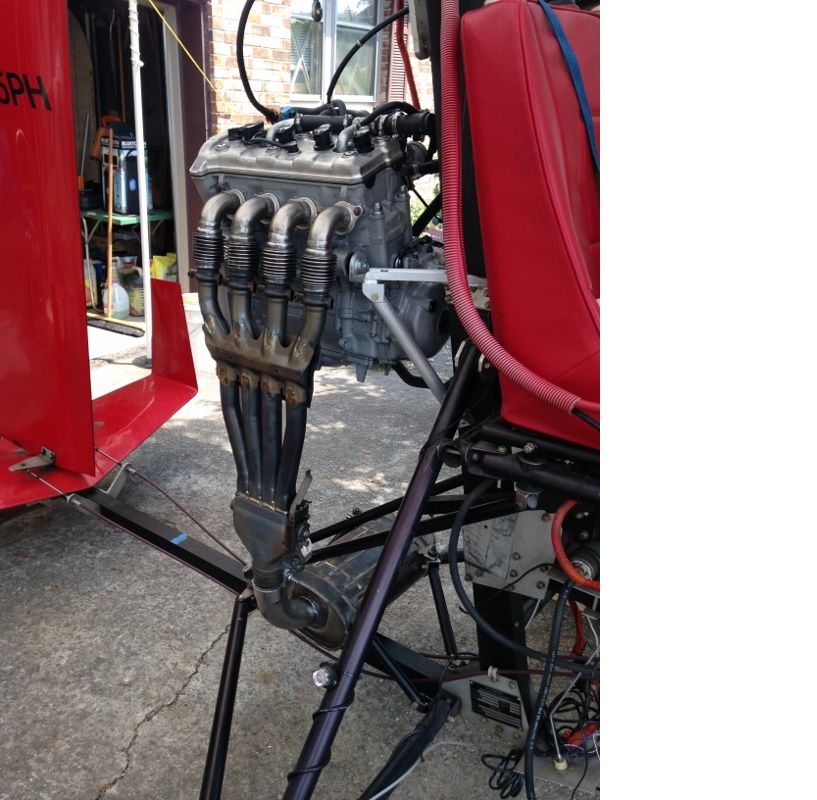
Photos of progress, the first ever Yamaha Genesis 4-cylinder (YG4) 165HP EXUP aircraft. This is going on an Air Command gyroplane - again.
To refresh for those who have forgotten, or perhaps are new to this stuff, the first ever Yamaha aircraft was Todd Reick's 120 HP YG3 Air Command single in 2007. The first ever successful YG4 (RFD's was plagued with electrical, starting and clutching issues along with power loss due to intake and exhaust design errors, which to the best of my knowledge were never sorted out when it was sold to someone out west) was my personal 140hp Air Command tandem.
The 2003-2005 RX1 snowmobile engines were carbbed and put out 140-145HP, depending on which dyno sheets you're looking at from the independent shop of Dynamic Research, Inc. the third-party that does all the AMSNOW qualifying dnyo work each year.
In 2006 the Apex sled was introduced with EFI and accompanying cam grinds that suit the stingier fuel flow of EFI. Those engines produce 145-150HP depending on year and which dyno sheets you pull.
2011-2018 models were upgraded again with EXUP, a titanium 4-into-1 header collecting at a valve actuated by a computer-controlled electric motor that is not unlike your car's power window mechanism. This system was pioneered by Yamaha in 1983 on their bikes. Honda copied it the following season. That's what I'm talking about when I say exhaust is so important to power.
EXUP produces 160-165HP, a gain of fully 10% not just on the top end by opening up the back pressure on the pipes, but throughout the ENTIRE power band by simply closing down the flow at the collector with a butterfly valve. This produces not just a smooth, predictable power curve but actually increases HP in the midrange as well! Amazing.
I swore I would never build another conversion for a customer, but Geoff Resney, PRA Chapter 18, begged me for a year to do one for him when the time came that his Subaru quit. He said when, not if. That wasn't me. I told him there just wasn't any money in it for me to do installs, and that if I was going to do it again I was going to get paid $28.50/hr, machining included. Strictly T&M.
We agreed to a schedule, some ballpark prices, and earlier this year he showed up with his wife, dog, and three kids at my door, Air Command in tow behind his RV, sans 320# of broken Subaru.
The Air Command tandem lends itself well to this EXUP build, since you can't just cut and weld titanium like steel. Leave the pipes as-is, and build the rest of the exhaust around it. But this type of aluminum round tube construction presents its own set of obstacles and build peculiarities.
(I expect you could cut the EXUP valve pipes about 6" upstream, and clamp headers to them. In that way you could wrap the headers around and tuck the valve up underneath the engine.)
One thing I've read about these EXUP titanium exhausts is that they can crack. So extreme care has been taken to properly secure the heavy stock SS muffler (18 #) while isolating engine shake & vibration. Note the yoke bracket milled from aluminum billet holding the header to the right, angular, keel support. The header grommets are secured to it and the headers are free to slide up and down +/- 3/8", but the lateral movement fore/aft is +/- 1/16" and side-to-side is next to nothing.
There are easier, simpler ways to attach this muffler to the keel, but I wanted it upside down like this since the other way the muffler seam is on top, so it actually looks nicer this way. And I wanted to drill as few holes as possible into the air frame sections.


More pics
IMG_6129 (600x800).jpg
IMG_6130 (600x800).jpg
IMG_6125 (800x800).jpg
IMG_6126 (800x800).jpg
Here is some progress to show and tell. Notice the new wire jacket mesh I am now using, I able to weld the seams closed after slipping it over the stripped and looped harness!
For builders using the stock multi-function display (MFD) with the tach and speedo I am adding resistors to indicate 1/2 tank of fuel so the empty indicator does not flash, and quell the open circuit warning light for the eliminated hand warmers. Next, the correct resistor can be installed to replace the water temp sensor and defeat any possible limp modes occurring at low temps and excessive high temps, offered as an option as well, but on this particular build I am using the stock water sensor. Should the sensor fail in flight, the cold blue light will appear on the MFD, but the engine will not return to idle so long as the throttle is left open.
HOWEVER! On EVERY YG2, YG3 and YG4 that I am aware of should the water sensor fail then IF the throttle is returned to <3500 RPM then you will NOT be able to throttle back up to anything beyond fast idle, ~ 3500 RPM! Take heed.
If anyone wants advice on swapping out the water sensor for a resistor email me info@mohawkaerocraft.com
The ECU mast bracket is milled and threaded. Extra long M6 screws are used so that on the backside a pair of washers set off the steel fuse box bracket away from the ECU bracket to provide room for the stock fuse box clip to fit into place, and nylok nuts hold it firmly together.
IMG_0067.JPG
Mast Bracket 1.jpg
Mast Bracket 2.jpg
Mast Bracket 3.jpg
Mast Bracket 4.jpg
Mast Bracket 5.jpg
Mast Bracket 6.jpg
Mast Bracket 7.jpg
This is for the starter relay. I like to use the stock wire that connects the relay to the starter motor, which means the relay has to be right at the starter, using a rear crankcase cover M6 screw to hold into place. When I strip down a sled myself I use the bracket that I cut off that comes as part of the battery box. You can see it on Kurt's YG4. On this build for Geoff I fabricated the bracket from 16g 1018 sheet steel, MIG welded the two pieces together and painted with enamel.
Starter Relay Bracket 1.jpg
Starter Relay Bracket 2.jpg
Starter Relay Bracket 3 (640x480).jpg
All these little things add up. The stock relays have rubber mounts attached, so I like to take advantage of all the benefits they provide.
IMG_6613 (480x640).jpg
IMG_6617 (480x640).jpg
Better yet - IT LANDS!!!!!!
Got the magnificent beast in the air this evening at sundown form two full-length RW crow hops.
Took off at about 1/2 power, and wanted to climb like an angel til I pulled back power to keep it around 20 feet.
Video....all I have to say...except, possibly congratulations.
If you are not one of my friends, than you are not allowed to view this video. Sorry, but I have to draw the line somewhere.
https://www.youtube.com/watch?v=n0jmIPf9Ctc
Scott McNeil made MANY trips to the hanger at CUB in Columbia at my bequest, to be my guy on the ground so I might feel a bit better knowing that someone I trust has a phone in hand just in case...
Each time there was something else that got in the way of me taking off. FINALLY I got things the way I wanted them for first flights and VOILA!
He tried standing closer to the RW for a better smart phone vid, but the airport management unceremoniously shooed him away.
As I was rolling down the runway here, spinning up the whirling thing, it started sprinking and I was reminded why I like windscreens. That, and the big fat bug that hit me on the cheek in prior effort to balance on the mains, ya'll.
I'd like to extend my great appreciation to Scott M for driving the 40 minutes one-way on so many occasions, only to be disappointed and not get to see this latest monster concoction from the Mohawk skunk works come to life and take to the air. Scott is about as good a friend as anyone could find.
One last note: We now have THREE GYRO PILOTS communing here at CUB! Tony Mattioli recently bought a Silverlight AR1. It is still in FLA, and very soon he will be bringing it to the hanger his FW now occupies across from and facing mine.
"Holy Gyros, Batman!"
Guess what this post is? PICTURES!
IMG_8481 (640x480).jpg
IMG_8502 (640x480).jpg
IMG_8495.jpg
IMG_8493 (640x480).jpg
Did some work on the towers, took her out for a a few crow hops. Brought it back in, checked everything over, went back up and did the first S turns. Then I decided it was time to take her around the pattern finally. After several laps, over the taxiway, back along the opposite side of the RW, etc., two Apache helos approach on final as I was flying downwind over the taxiway at 100 ft.
One splits left, the other right, and they pass at my AGL on either side, checking me out. They come around, I go around, and when we meet up again they line up and we do a low pass parade at 5 ft, with me bringing up the rear evenly spaced 1-2-3, then pull up and climb out, then they peeled off and left me to my laps again.
All the folks at CUB airport loved it. After about 30 minutes total of doing laps, I did a touch-and-go, another lap, then brought her in for the night.
The regular traffic resumed, guys took off, other guys landed, and I closed the hanger doors and headed home.
So far this is turning out to be a VERY friendly airport! Lots of waving, lots of fist pumps, lots of thumbs up. Every plane that passes by waves. Everyone in their hanger comes out to watch. Ground traffic pulls off to let me by if I haven't been able to do so first.
I love this place.
If you ever get a chance, please drop in and see us here at CUB: Me, Tony Mattioli, and Scott McNeil. Air Command, Silverlight, & Tango.
Ya'll come down, he'ya?
Hey guys. Reporting that I had accumulated 3 hours of time on the ground and in the air, and to date Geoff has another 8 hrs in the air. So far, so good. Geoff reports that the climb rate is scary. He also says he has a sensation that when he pulls BACK on the throttle to ease over after a hard climb that it feels like the gyro INCREASES its climb rate momentarily, which is unsettling.
I can't figure that one. Can you?
Since the build's successful flights were announced elsewhere, we have nicknamed this Air Command "Godzilla", for obvious reasons.
Here is tail art we ordered from a sticker shop in FL.
HDAI4988 (640x640).jpg
Because it spouts fire and smashes buildings? Or perhaps, that it would survive an impact with powerlines?
Oh wait...Japanese engine....OK, I get it.